Deciphering the Reliquary of Strength: The Ultimate Guide to the Ishikari Plain Puzzle in Ghost of Yōtei


Popular Now
 Free Fire Max
 Call of Duty
 FIFA 23
 Fall Guys
 Candy Crush Saga
 Among Us
 R.E.P.O
 NBA 2K24
 Toca Boca World
The vast, beautiful, yet perilous open world of Ghost of Yōtei is littered with secrets that challenge the player’s intellect as much as their samurai combat skills. Among the most rewarding are the Mountain Reliquaries—enigmatic puzzles that test Atsu’s spiritual connection to the land and yield powerful rewards. The Reliquary of Strength, located in the frigid Ishikari Plain region, is a prime example of this AAA action RPG‘s layered optional content and is crucial for those seeking the ultimate damage reduction charms and the Child of the Mountain trophy.
This comprehensive Ghost of Yōtei guide, fully updated for the latest 2025 release, provides the precise location, riddle breakdown, and step-by-step solution to solve the Reliquary of Strength puzzle without resorting to a frustrating trial-and-error approach. Mastering these challenges ensures Atsu is fully prepared to face the Yōtei Six and the high-stakes boss fights ahead.
Location and Clue: Finding the Reliquary of Strength
The Reliquary of Strength is typically the second Mountain Reliquary players encounter, following the Reliquary of Courage in the Yōtei Grasslands. It is situated in the central-southern part of the Ishikari Plain, near the Ishikari River and just northwest of the Ishikari Fork landmark. It is positioned on a cliff edge, often overlooking the river area, a location easily reachable via a sloping path from the northeast.
The Inscription’s Riddle: Deciphering the Spirits
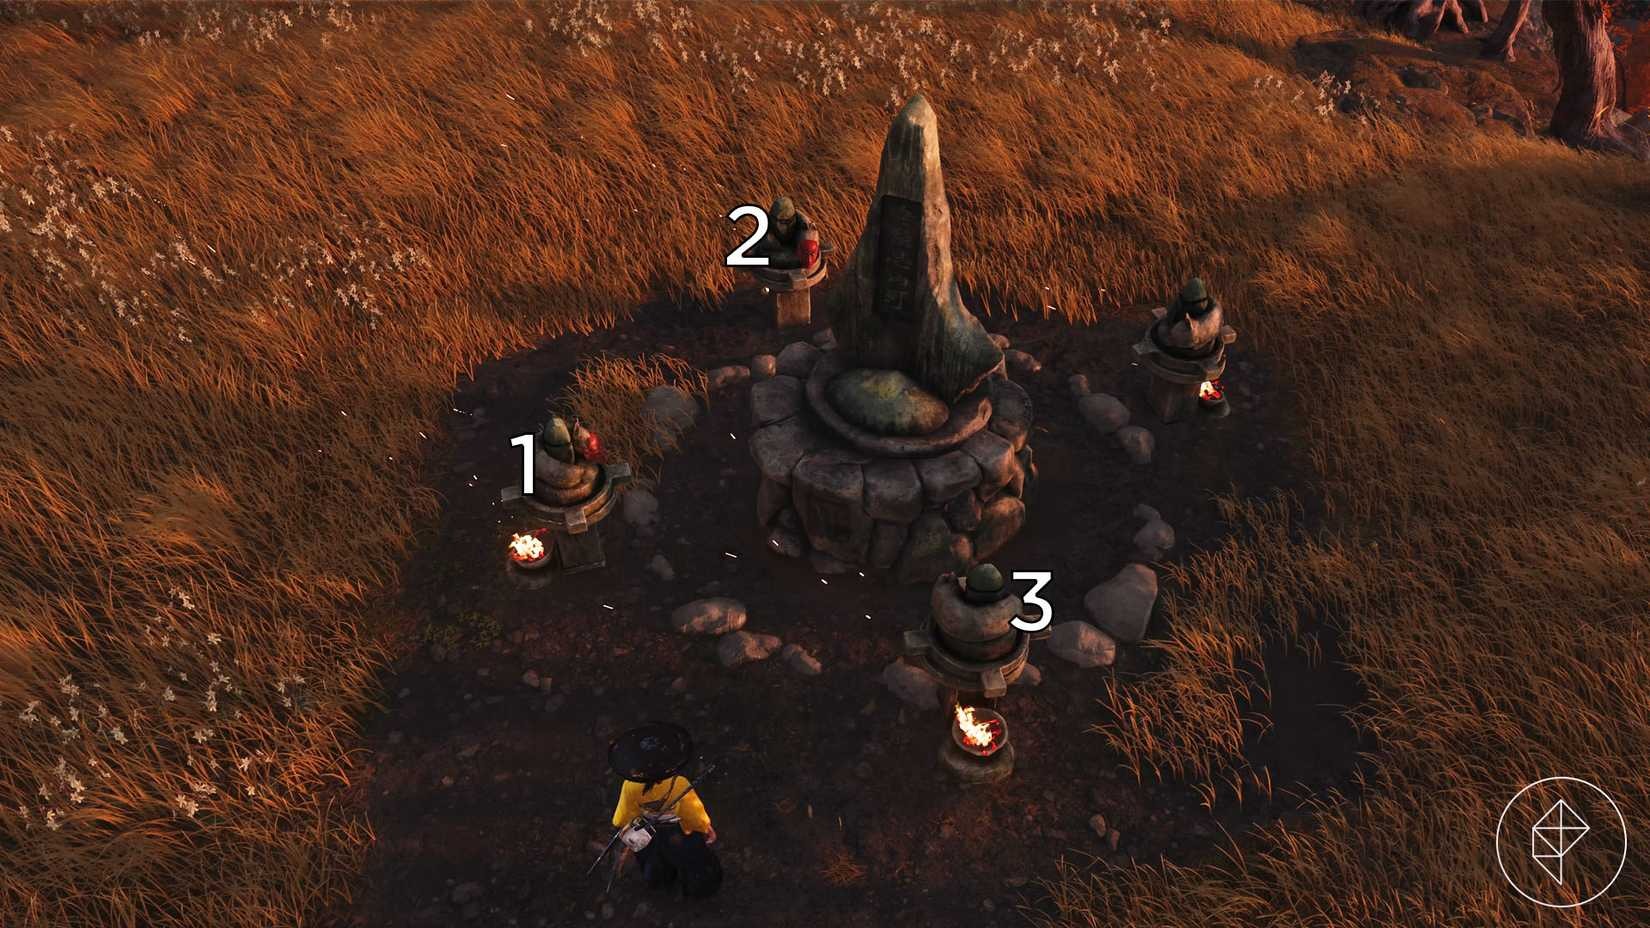
Upon reaching the cluster of statues surrounding the central stone altar, Atsu can read the inscription, which serves as the puzzle’s clue:
“The mountain raised the boy as her own. Demons looked away from them in fear. But the wolf watched them both, ready to provide aid.”
This riddle dictates the final orientation of the four surrounding statues, each of which can be turned by interacting with its pedestal. The key is to correctly identify which statue represents which character:
- The Mountain/Boy: This refers to the large central stone/altar. The boy is typically represented by the one wolf statue that does not wear a mask.
- The Demons: These are the three wolf statues wearing Oni masks.
- The Wolf: This refers to the one wolf statue without a mask, which represents the guardian spirit.
The Solution’s Goal:
- The Wolf (unmasked statue) must face inward toward the central Mountain/Boy stone.
- The Demons (masked statues) must face outward (away) from the central stone/Mountain.
The Mechanics: Understanding the Interconnected Statues
The true difficulty of the Mountain Reliquaries lies in their unique interaction mechanic. When you rotate a statue:
- Turning one statue also turns an adjacent statue.
- Specifically, turning one statue 90 degrees will turn the statue to its right (counterclockwise around the reliquary) a full 180 degrees.
This makes a direct approach impossible. If you make a mistake and need to restart, simply fast-travel away and back to the reliquary to reset all statues to their original starting positions, a crucial gaming tip for solving these puzzles.
The Solution: Step-by-Step Instructions
To successfully solve the Reliquary of Strength, you need to use a precise sequence of rotations. We will refer to the statues based on a clockwise (CW) perspective, starting from the wolf (unmasked) statue as the Front (S1), and moving right to the Demons (S2, S3, S4).
Initial Setup: Face the Reliquary inscription plaque. The unmasked Wolf is typically the statue to the front-left or directly in front of you.
Assuming a starting position where the unmasked Wolf is Front-Left (S1), proceed with this specific rotation sequence (where 1 turn = 90 degrees):
- Strong Move 1: Rotate the Front-Left Statue (Wolf) once.
- Effect: This moves the Wolf closer to facing the center, but the statue to its right (Front-Right Demon) also rotates 180 degrees, pushing it away from the center.
- Strong Move 2: Rotate the Back-Left Statue (Demon) twice.
- Effect: This moves the Back-Left Demon to face away from the center, and the Wolf rotates 180 degrees, pushing it to face the center/mountain.
- Strong Move 3: Rotate the Front-Left Statue (Wolf) once.
- Effect: This adjusts the front statues into the correct final position.
- Strong Move 4: Rotate the Front-Right Statue (Demon) twice.
- Effect: This adjusts the final two statues (Front-Right Demon and Back-Right Demon) into their correct final positions facing away.
Upon successfully aligning all four statues—the unmasked Wolf facing inward toward the central stone, and the three masked Demons facing outward away from the stone—the puzzle will be solved.
The Reward: Strengthening the Onryō
Completing the Reliquary of Strength grants the player immediate access to powerful rewards, which scale based on how many Reliquaries you have already solved. If this is your second reliquary (after the Reliquary of Courage), you will receive:
- Charm of Mount Yōtei (Upgraded): This essential major charm is upgraded to reduce all damage taken by a moderate amount, significantly improving Atsu’s survivability in demanding late-game combat.
- The Yōtei’s Shelter Hat: A unique, non-stat-affecting cosmetic gear item that adds another piece to your collection.
Solving these relicaries is a rewarding blend of lore, exploration, and logical problem-solving that deepens the immersion in the Ezo open-world and provides tangible benefits to your gameplay experience. Happy hunting, samurai, and may the strength of the mountain guide your blade.